Article written by Ann Marie.

Although I am just getting started blogging on my site, this is one post I have been aching to write even before my new website launched. Feedburner is no doubt the most popular method for emailing blog posts to subscribers. However, I think many users do not realize its potential and all the ways the service can be utilized to maximize readership and sharing. This post will take you through 5 major ways to easily optimize your Feedburner account.
I’m going to walk you through one of my client’s Feedburner’s accounts because she is really active at testing which methods work best for her readers. Keep in mind not all optimization techniques work for all types of markets. In my opinion, this is true for much of the online marketing advice out there. Sometimes generalized assumptions may not work well for your type of customers or readers. You need to experiment and test and find which method works best for your business.
1. To Summarize or Not to Summarize?
Well, that is the question. Did you know you do not have to email your full blog post to your subscribers? This is the default setting so most Feedburner users just leave that option as is. Isn’t the point to bring more visitors to your site? Then why not entice them with an excerpt of your post and then they will have to click to read more on your site. Barbara and I tested this versus the full summary of the post and MAN oh MAN what a difference it made in the amount of comments and click throughs to her site. Here is how you do it:
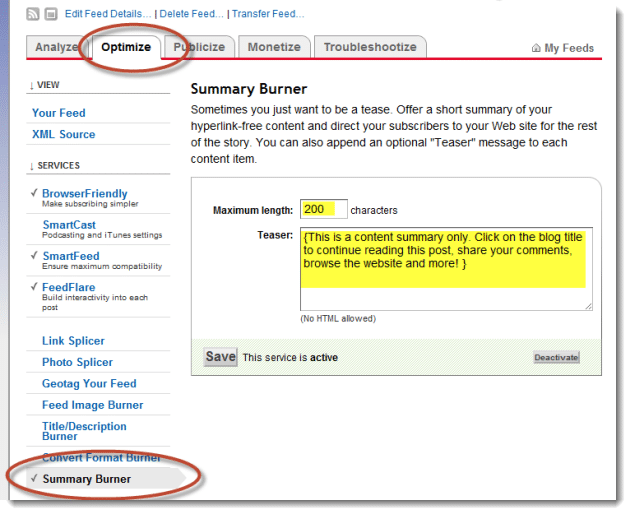
Unfortunately there is no Read More –>; link that can be added, so you need to direct the reader to click on the title to continue reading the post. It’s a workaround, but it works, as long as you keep the maximum length short enough that the reader wants more and long enough that they get an idea of what the post is about. 200 characters usually works well.
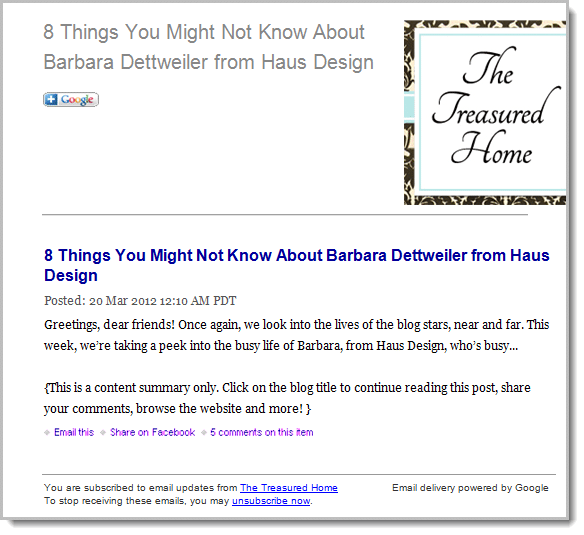
What the reader sees is this – short, sweet, and wanting more. As always tell them what you want them to do next “Click on the title to continue reading the post”.
2. Add Your Logo
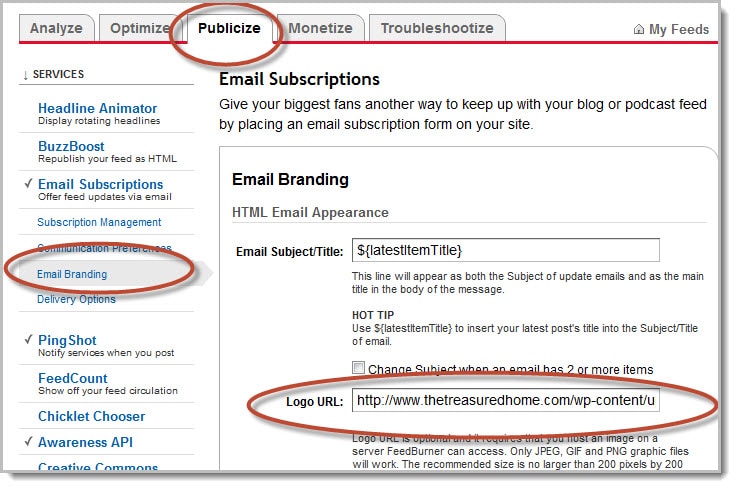
You may have noticed in the screen shot above The Treasured Home’s logo next to the blog title. It never hurts to keep reminding people who you are – so use that logo of yours. It is easy to add in Feedburner – just copy and paste the URL of your logo here:
3. Subject = Blog Title
This is a big one for me. It surprises me how many people just leave the default for this one. Often times Feedburner emails will have the same static subject every time which may even be the same as the sender’s name. Therefore you receive an email that reads “The Treasured Home Blog” from “The Treasured Home” once a week. If your readers see the same subject line every week, do you really think they are excited to open that email? I certainly am not. So there is a very easy automated way to change that subject line:
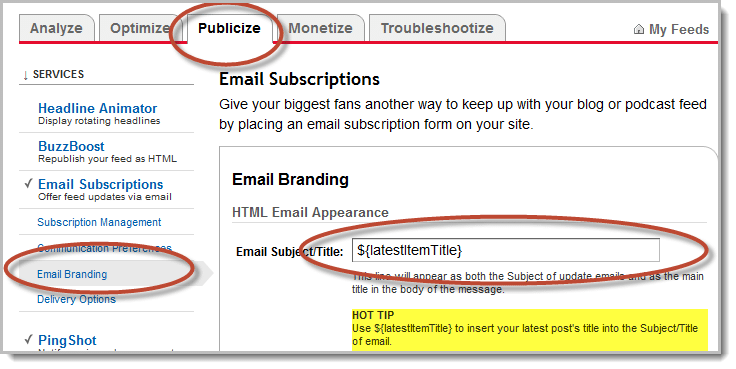
4. Quick Link to Comments
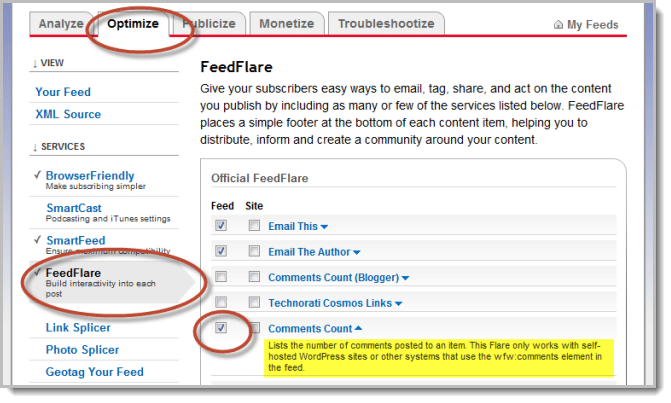
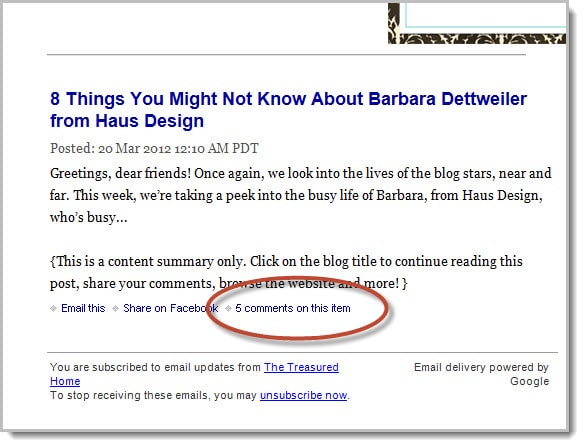
One of the coolest parts of Feedburner’s many options is FeedFlare or share links in the footer. Many of you may have activated those already (please do if you haven’t yet). However, I believe one of the most effective footer links in the Feedburner email is the Comments link. Right away you can see how many comments there have been on the blog post and once readers see there are comments they are more intrigued to read the post and make a comment themselves. Here is how you do that.
And this is what it looks like in an email – a quick link to the comments of that particular post.
5. Set the Time of Email Delivery
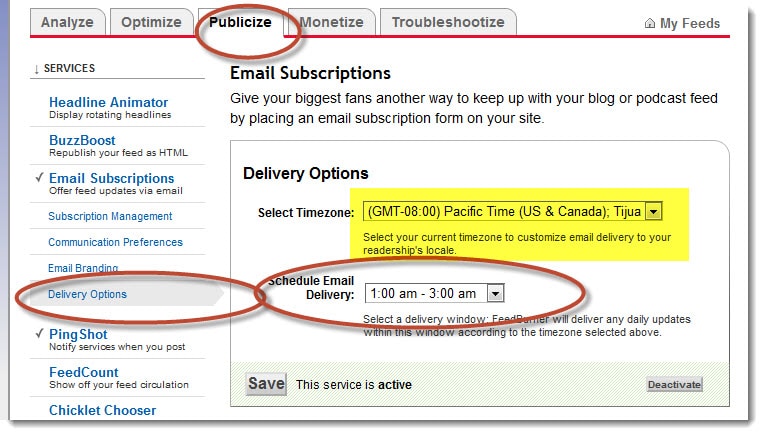
Have you ever wondered what the best time is to send emails to your subscribers? Did you know you could change the time frame in which your post emails are sent through Feedburner? Well you can and why not test it? Barbara and I did just that and found out that super early in the morning was best for her market. Even though she lives in California, many of her blog readers live in New York. Most of her comments were made in the morning so she decided to switch her sending time from 11am Pacific Time to 1-3am Pacific/4-7 am Eastern. Many of her readers (just like myself) sip a cup of coffee and grab their smart phone or iPad and read their favorite blogs first thing in the morning (my dad is still confused why I no longer read a real newspaper – but that’s another post). Almost every morning Barbara’s posts are sitting waiting her subscriber’s inboxes when they wake up. We have seen a big jump in readership and comments because of this move.
This is how it is done. I suggest testing a different time every 60 days and see if there is a difference in activity.
SOME TIPS:
1. Make sure your the time in your WordPress settings is in YOUR time zone. This will throw the delivery timing off if it isn’t.
2. Make sure when you schedule a blog that is timed BEFORE the scheduled Email Delivery time in Feedburner. (Obvious – but I goofed on this one a couple times).
3. This screen is also where you can DEACTIVATE sending emails from Feedburner all together if you still want to keep your account active but just want to stop email service.


